Makin’ Basic Bacon
Course: Anything you want!Cuisine: Heart StoppingServings
10
servingsCuring Time
3
DaysSmoking Time
~2
HoursFrom the pigs belly to your mouth!
Ingredients
3 pounds unsliced raw pork belly about 1 1/2″ thick and 6 to 8″ wide across the grain
3/4 cup distilled water
6 tablespoons dark brown sugar
4 1/2 teaspoons Morton’s kosher salt
4 1/2 teaspoons ground black pepper
1/2 teaspoon Prague Powder #1
Directions
- Prepping the pork belly
- If the skin is still on the belly, remove it and use it to make cracklins. It is sometimes hard to tell if it is still there. It is usually a darker tan color compared to creamy colored fat. You should be able to make a cut in fat with your thumbnail. Your thumbnail will only make a dent in skin.
- Leaving skin on causes problems for salt penetration, and when you fry it, the skin gets very hard and you probably won’t like the texture.
- Removing the skin can be tricky. Sometimes you can grip a corner with your fingers and run a knife under the skin to peel it back by running the knife between the skin and fat. Sometimes you just have to shave it off with a sharp knife.
- Starting the cure
- Pour everything except the meat into a zipper bag large enough to hold the belly. A 1 gallon bag will hold a single 3 pound slab.
- Zip the bag and squish everything around until well mixed.
- Now add the belly, squeeze out the air as much as possible and squish some more rubbing the cure into the belly and coat all sides. Put the bag in a pan to catch leaks and place in the fridge at 34 to 38°F for 3 to 5 days.
- If the belly is thicker than 1.5″ check the calculator here.
- The belly will release liquid so every day or two you want to gently massage the bag so the liquid and spices are well distributed, and flip the bag over.
- NOTE: If you use more than one slab in a bag it is crucial that the slabs do not overlap each other. Thickness matters!
- After the 3-5 day cure
- Remove the belly from the bag, and throw the liquid away.
- Quick rinse it to wash off any thick deposits of salt on the surface.
- Most recipes tell you to let the slab dry for 24 hours so the smoke will stick better, but, as the AmazingRibs.com science advisor Dr. Greg Blonder has proven, smoke sticks better to wet surfaces, so this extra step isn’t necessary.
- Smoking the meat
- If you are using a grill, set up for 2-zone cooking or fire up your smoker.
- Smoke over indirect heat at 225°F until the internal temp is 150°F, about 2 hours.
- You can use any wood you like.
- Hickory is the tried and true. I’m partial to cherry and applewood.
- After smoking you should slice off the ends, which may be very dark and more heavily seasoned, and taste them right away. They will be more salty than the innards and the fat will be a bit stringy, but you’ll love it all the same. Just wait til you cook up an inside slice!
- Prepping the now smoked bacon
- Now let it cool on a plate in the fridge. Cold bacon is easier to slice.
- Use on a slicer if you have one, or use a long thin knife to slice it.
- Try some thin and some thick slices. You can also cut bacon in cubes to make lardons and use them like bacon bits in salads, mashed potatoes, mac and cheese, baked beans, in sauces or to garnish chops, or roasts.
- Storage and cutting
- Wrap it tightly with several layers of plastic wrap, and then a layer of foil, and refrigerate for up to 2 weeks or freeze for up to 3 months.
- Do not wrap in foil alone because it can react with the salt.
- Slice it across the grain. For evenly thick slices, a slicing machine is the best choice, but I rarely use mine because it is a pain to clean. Besides, I like to keep the slab intact and tightly wrapped in the fridge or freezer to reduce exposure to oxygen which can make the fat taste funny in a week or two.
- When I make bacon I usually shoot for hunks 6 to 8″ wide across the grain to make sure my thin 9″ knife and frying pan fit.
- If you put a slab in the freezer for 15 minutes or so it gets stiffer and easier to slice.
Notes
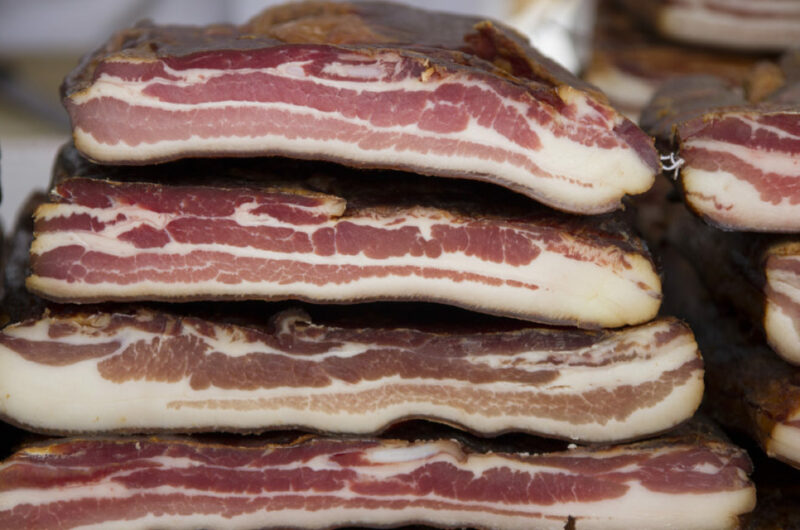
- About the pork belly. Look for pork belly that has about a 1:1 ratio of muscle to fat. The muscle should be pink and the fat creamy white. My favorite bacon is made from the layers of fat and meat that lie on top of the spare ribs, called “side bacon” or “streaky bacon”. It can be about 1:1 or 1:2 with more meat, depending on the breed of hog, age of the hog, feed, and other variables. When shopping, ask your butcher to order some fresh, unfrozen, raw side or belly bacon slab, unsliced. It should be about 1 1/2″ thick and 6 to 8″ wide across the grain to make slicing easy and to make sure it fits in the frying pan. It should look like the picture shown here. If you want to have fun, order pork jowl instead, which tends to be 40 to 60% muscle. Make sure you explain that you want raw bacon, not cured, and not sliced. Ask your butcher to remove the skin but save it for you so you can make cracklins. You can freeze the skin until you are ready to make the cracklins. If you got sliced belly by mistake, marinate it in your favorite marinade, cook it straight, or adapt this recipe for pork belly. An Asian marinade like teriyaki/huli huli is great. But don’t try to cure sliced pork belly. As soon as you get your slab home, start the cure because raw pork fat does not age gracefully. It gets rancid and smells funky in only 5 to 6 days. That’s a flavor beloved in many European and Asian countries, but not so much in the U.S.
- Optional. Make your first batch according to this recipe. For your second batch, if you wish you can add fresh garlic or dried garlic, citrus zest, herbs such as thyme, bay leaf powder, celery seed, chile pepper, fennel, or coriander.